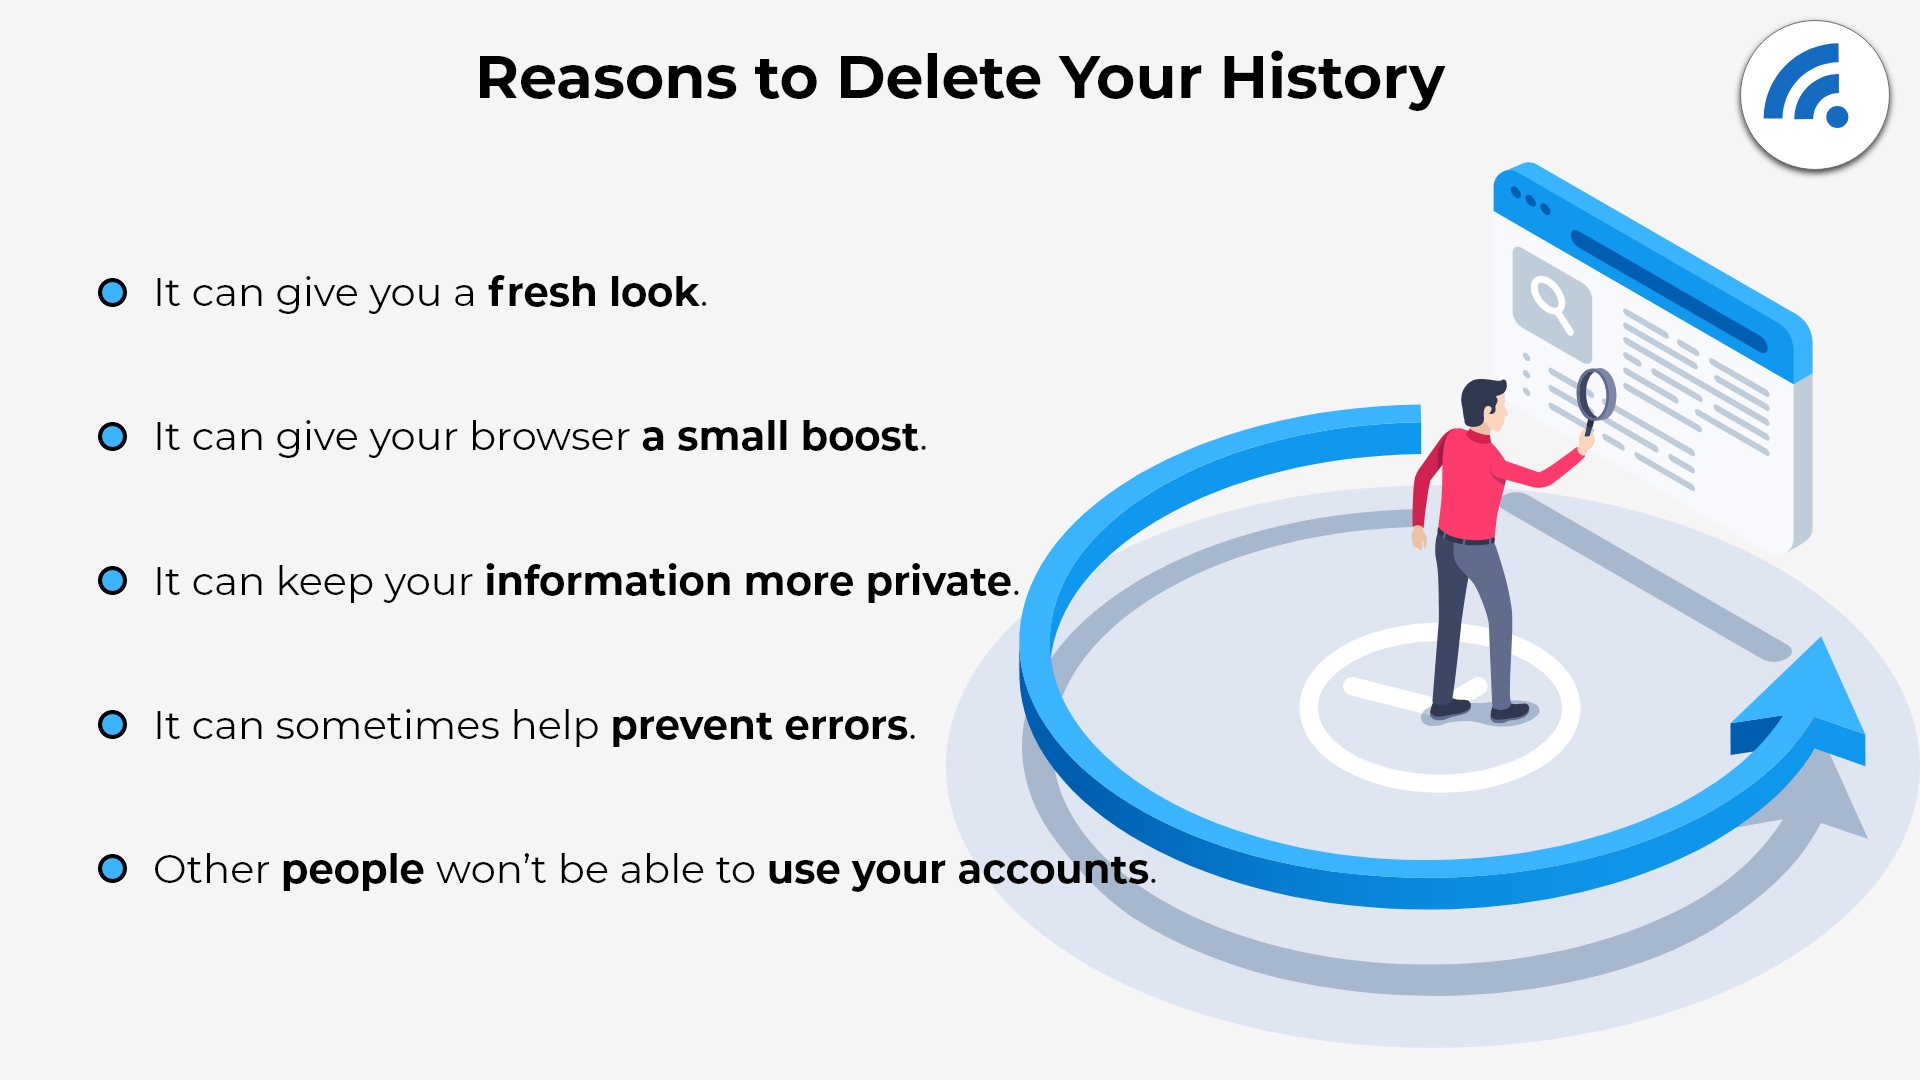
Clearing your browsing history is a simple yet essential practice for maintaining privacy and ensuring your online activities remain secure. Whether you’re using Google Chrome, Mozilla Firefox, Microsoft Edge, Safari, or any other browser, knowing how to clear your history can protect your personal information from being accessed by unauthorized individuals. In this blog, we will guide you through the step-by-step process of clearing your browsing history in various popular web browsers.
1. Clearing Browsing History in Google Chrome
Clearing your browsing history in Google Chrome is an essential practice to maintain your privacy and ensure that your online activities remain secure. Whether you want to delete specific searches or wipe out your entire browsing history, Google Chrome makes it easy to do so. In this guide, we will walk you through the step-by-step process of clearing your Google Chrome history on a desktop computer, allowing you to enjoy a more private browsing experience.
Google Chrome is one of the most widely used web browsers. To clear your browsing history in Chrome, follow these steps:
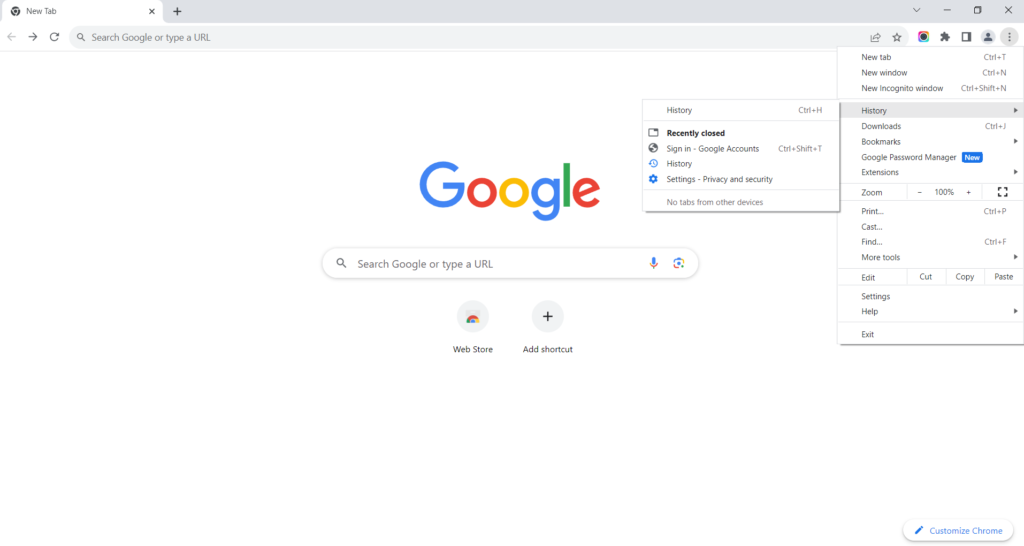
Step 1: Accessing the History Menu
- Launch Google Chrome on your desktop computer by clicking on the Chrome icon in your taskbar or system tray.
- Once Chrome is open, look for the three vertical dots located in the top-right corner of the browser window. Click on these dots to open the Chrome menu.
- From the menu that appears, hover your cursor over the “History” option. This will reveal a submenu with additional history-related options.
Step 2: Choosing the Time Range
- After clicking on the “History” option, you will see a list of recent web pages you’ve visited. Now, click on the “History” option again from the submenu.
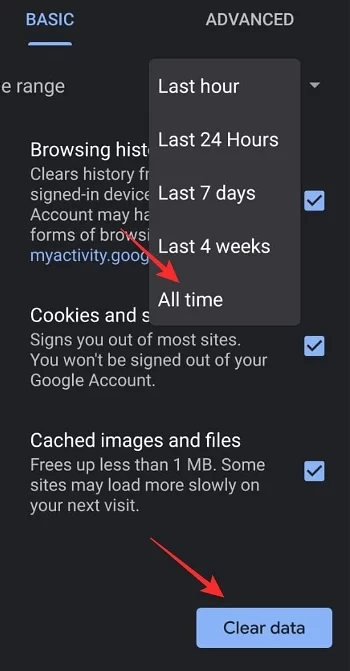
- Once the full browsing history is displayed, you will notice a menu bar with various time range options, such as “Last hour,” “Last 24 hours,” “Last 7 days,” “Last 4 weeks,” and “All time.”
- Choose the time range for which you want to delete the browsing history. If you want to clear everything, select “All time.”
Step 3: Clearing the Browsing History
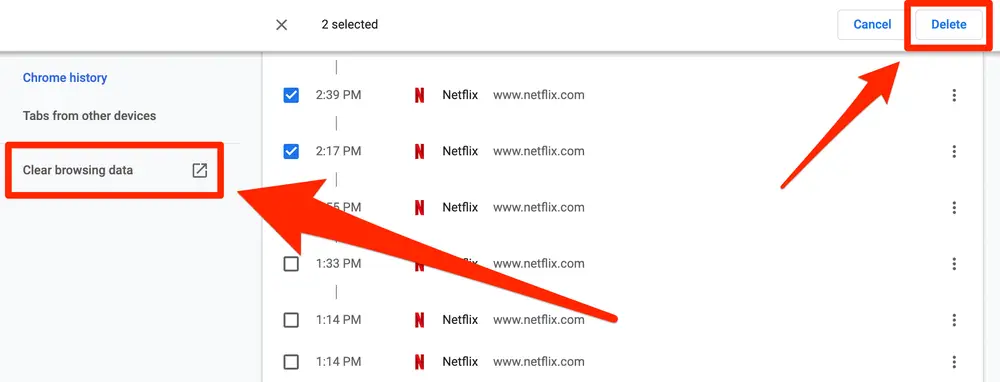
- With the desired time range selected, click on the “Clear browsing data” option located on the left-hand side of the screen.
- A new window will appear, offering you various options for clearing your browsing data. You can select “Browsing history,” “Download history,” “Cookies and other site data,” “Cached images and files,” and more.
- To clear your search history, make sure to check the box next to “Browsing history.”
- If you want to clear other data like cookies and cached files, check the respective boxes. Be cautious when clearing these data types, as doing so may log you out of websites and delete preferences stored on certain sites.
- Once you’ve chosen the data you want to clear, click on the “Clear data” button at the bottom-right corner of the window.
Step 4: Confirming the Deletion
- After clicking “Clear data,” a pop-up confirmation window will appear, asking you to confirm the action.
- Double-check that you have selected the appropriate data types and time range for deletion.
- Click on the “Clear” button to finalize the process.
Clearing your Google Chrome history on a desktop computer is a simple yet crucial practice to protect your privacy and ensure a secure browsing experience. By following the step-by-step instructions provided in this guide, you can easily clear your search history, browsing history, and other relevant data, allowing you to maintain control over your online footprint. Regularly clearing your browsing history helps keep your information safe from unauthorized access and ensures a cleaner and more private browsing experience.
2. How to Clear Google Chrome Browsing History on Android
Clearing your browsing history on Google Chrome for Android is a simple and effective way to maintain your privacy and keep your device running smoothly. Whether you want to remove your search history, delete specific website data, or clear everything at once, Google Chrome offers easy-to-use options for managing your browsing information. In this guide, we’ll walk you through the steps to clear your browsing history on Android.
Step 1: Open Google Chrome
Unlock your Android device and locate the Google Chrome app. It’s recognizable by its round icon with red, green, yellow, and blue colors.
Step 2: Access Chrome Menu
Tap on the three vertical dots located in the top-right corner of the Chrome browser. This will open a drop-down menu.
Step 3: Go to History
From the drop-down menu, select “History.” You will be directed to a new page showing your browsing history.
Step 4: Clear Browsing Data
To clear your browsing history, tap on the “Clear browsing data” option at the bottom of the page.
Step 5: Choose the Time Range
Chrome will now prompt you to select a time range for which you want to delete your browsing history. You can choose from the following options:
- Last hour
- Last 24 hours
- Last 7 days
- Last 4 weeks
- All time
Select “All time” if you want to delete your entire browsing history. Alternatively, you can choose a specific time range if you only wish to remove certain data.
Step 6: Select Data to Clear
On the same page, you’ll see a list of various types of browsing data that you can clear. These options may include:
- Browsing history
- Cookies and site data
- Cached images and files
- Download History
- Passwords
- Autofill data
- Site settings
Check the box next to “Browsing history” to clear your browsing history. If you want to delete other types of data as well, select the corresponding checkboxes.
Step 7: Confirm and Clear
Once you’ve selected the data you want to delete, tap on the “Clear data” button at the bottom of the page. A confirmation dialog will appear.
Step 8: Confirm Again
To proceed with the deletion, tap “Clear” on the confirmation dialog. Chrome will then clear the selected browsing data from your Android device.
3. How to Clear Browsing History in Safari on iPhone and iPad
Clearing your browsing history on Safari for your iPhone and iPad is a straightforward process that can help maintain your privacy and free up storage space. Whether you want to remove specific websites from your history or wipe it all clean, Safari offers a simple way to do it. In this guide, we’ll walk you through the steps to clear your browsing history on Safari for both iPhone and iPad.
Clearing Browsing History on Safari for iPhone and iPad
Step 1: Open Safari
Unlock your iPhone or iPad and locate the Safari app icon. It looks like a compass with red, blue, and white arrows. Tap on the Safari icon to launch the browser.
Step 2: Access the History Menu
In Safari, tap the book-shaped icon located at the bottom of the screen. This will open the “Bookmarks” menu.
Step 3: View Browsing History
To access your browsing history, tap the clock-shaped icon labeled “History” at the top of the Bookmarks menu. This will display a list of websites you’ve visited recently.
Step 4: Clear Browsing History
To clear your browsing history, tap the “Clear” button at the bottom of the History screen. A menu will appear with several options:
- Clear the Last Hour: This option will remove the browsing history from the last hour only.
- Clear Today’s History: Selecting this option will delete all the browsing history from the current day.
- Clear All History: To wipe out your entire browsing history on Safari, choose this option.
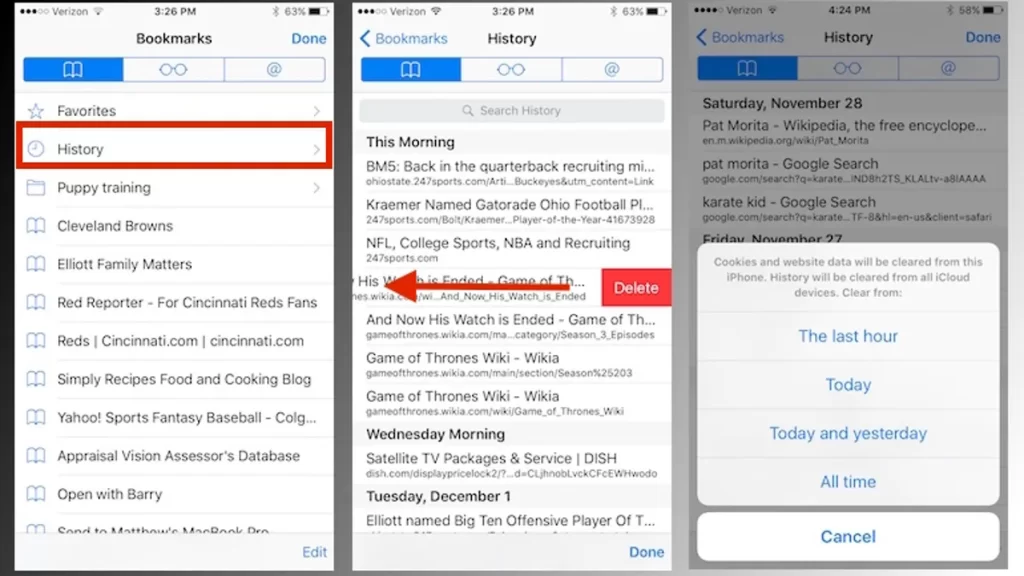
Step 5: Confirm Your Choice
After selecting your preferred option, a confirmation prompt will appear. Tap “Clear History” to proceed. Be aware that clearing your history cannot be undone, so double-check your choice before confirming.
Additional Tips: Clearing Individual Website History
If you only want to remove specific websites from your browsing history, you can do so individually. To clear the history of a particular website, follow these steps:
Step 1: Access the History menu in Safari by tapping the clock-shaped “History” icon.
Step 2: Find the website you wish to remove from the history list.
Step 3: Swipe left on the website’s entry, and a “Delete” button will appear. Tap “Delete” to remove that specific website from your history.
Clearing your browsing history on Safari for your iPhone and iPad is a simple process that helps protect your privacy and ensures a clutter-free browsing experience. Whether you want to clear your history for the last hour, the current day, or the entire browsing history, Safari offers convenient options to cater to your needs. Additionally, you can remove specific websites from your history if you wish. By following the steps outlined in this guide, you can easily manage your browsing history on Safari and enjoy a more private and organized online experience.
4. How to Clear Browsing History in Mozilla Firefox
When it comes to browsing the internet, Mozilla Firefox is a popular choice for its speed, reliability, and user-friendly interface. However, as you surf the web, Firefox keeps track of your browsing history, which may compromise your privacy or consume unnecessary storage space. To maintain a clean digital footprint and enhance your online privacy, it’s essential to know how to clear your browsing history in Firefox. In this guide, we’ll walk you through the step-by-step process, using the keywords “clear history Firefox,” “clean history in Firefox,” and “how to clear history on Firefox.”
Step-by-Step Guide to Clearing Browsing History in Mozilla Firefox
Step 1: Launch Mozilla Firefox
Open the Mozilla Firefox web browser on your computer. Ensure you have the latest version to access all the features and security improvements.
Step 2: Access the History Menu
Click on the three horizontal lines (the menu icon) located at the top-right corner of the browser window. This will open the Firefox menu.
Step 3: Choose “History”
From the menu, select “History” to access the browsing history options.
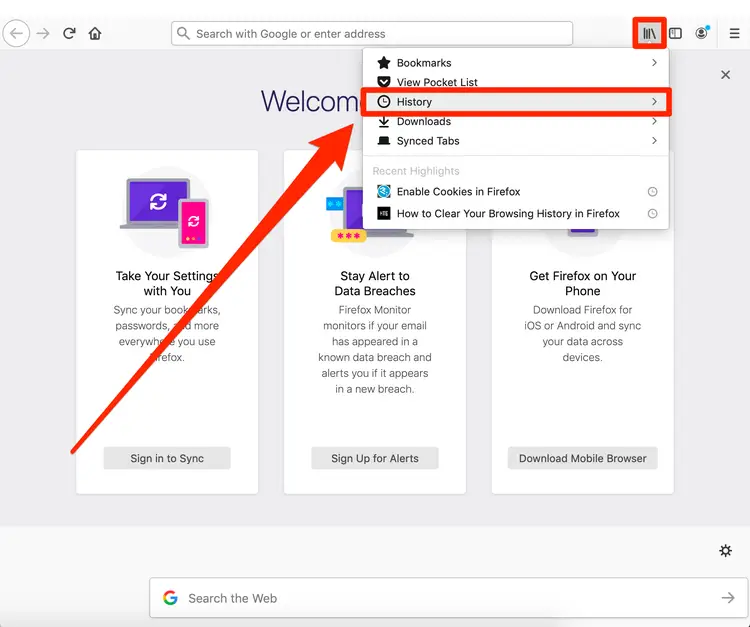
Step 4: Select “Clear Recent History”
In the History menu, you will find “Clear Recent History” as one of the options. Click on it to proceed.
Step 5: Choose the Time Range
A “Clear Recent History” dialog box will appear. Here, you can choose the time range for which you want to delete your browsing history. You have options such as “Last hour,” “Last two hours,” “Last four hours,” “Today,” “Yesterday,” and “Everything.” If you want to remove all your browsing history, select “Everything.”
Step 6: Select History Items
Below the time range options, you’ll see a list of history items that you can choose to delete. The options include “Browsing & Download History,” “Form & Search History,” “Cookies,” “Cache,” “Active Logins,” “Site Preferences,” and “Offline Website Data.” Tick the boxes of the items you want to clear. If you want to remove all types of history, select all the checkboxes.
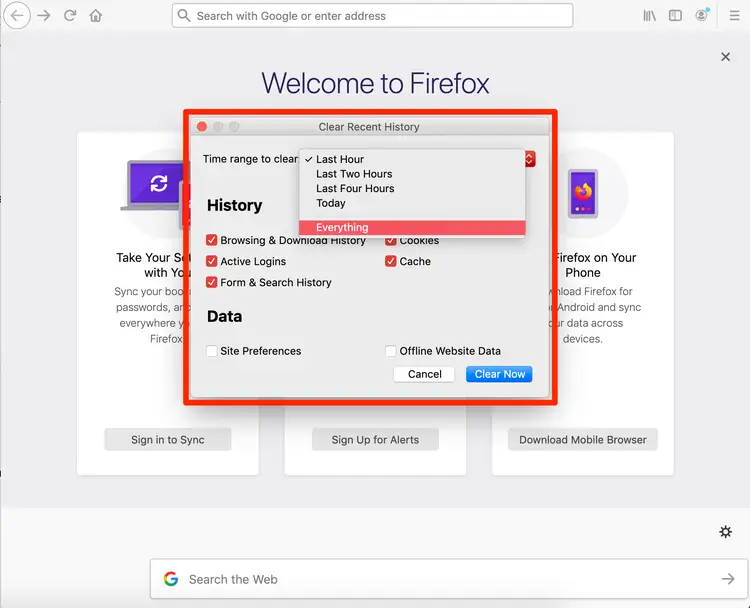
Step 7: Clear the History
Once you have selected the time range and the history items you want to delete, click on the “Clear Now” button. Firefox will then proceed to clear your browsing history based on your selected preferences.
Step 8: Confirmation
A confirmation message will appear once Firefox has completed clearing your history. This message will confirm the number of items that were removed.
Clearing your browsing history in Mozilla Firefox is a simple and effective way to maintain your online privacy and free up storage space. By regularly clearing your history, you can enjoy a clutter-free browsing experience while keeping your sensitive information secure. Remember to follow this step-by-step guide using the keywords “clear history Firefox,” “clean history in Firefox,” and “how to clear history on Firefox” to ensure a smooth and hassle-free process. Protect your privacy and enjoy a faster, more efficient browsing experience with Mozilla Firefox.
6. How to Clear Browsing History in Microsoft Edge
Microsoft Edge, the default web browser for Windows operating systems, offers a smooth browsing experience with its user-friendly interface. However, like any other browser, Edge also stores your browsing history, which includes the websites you visit, cookies, and cached data. If you value your privacy or want to free up some space on your computer, regularly clearing your browsing history is a good practice. In this guide, we’ll walk you through the simple steps to clear your browsing history in Microsoft Edge.
Method 1: Using Keyboard Shortcuts
Microsoft Edge allows you to quickly access the browsing history clearing options with a keyboard shortcut. Follow these steps:
- Open Microsoft Edge: Launch the Edge browser by clicking on its icon in the taskbar or searching for it in the Start menu.
- Activate the Clear Browsing Data Menu: Press the keyboard shortcut Ctrl + Shift + Delete simultaneously. This will open the “Clear browsing data” menu instantly.
- Select Browsing History: In the “Clear browsing data” menu, check the box next to “Browsing history.” You can also select other types of data you want to delete, such as cookies, cached images, and files.
- Choose Time Range (Optional): By default, Edge clears the browsing history from the last hour. If you want to delete history from a different time range, click on the drop-down menu and choose from the available options.
- Clear Browsing Data: Once you have selected the desired options, click on the “Clear” button to delete your browsing history.
Method 2: Using the Menu
You can also clear your browsing history through the Microsoft Edge menu. Follow these steps:
- Open Microsoft Edge: Launch the Edge browser on your Windows computer.
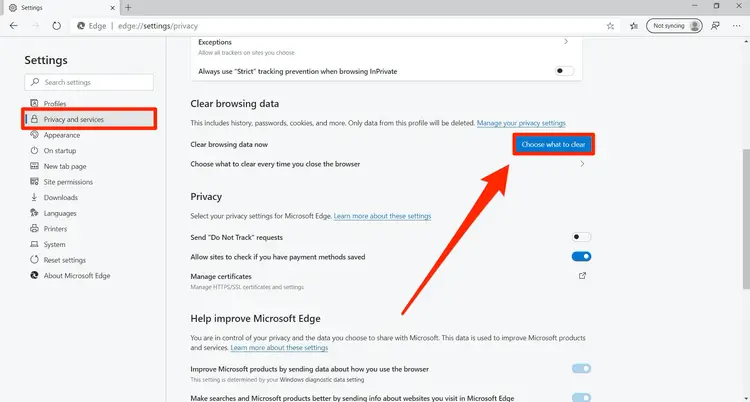
- Access the Menu: Click on the three horizontal dots (also known as the “More” icon) located at the top right corner of the Edge window.
- Open Settings: From the drop-down menu, hover over “History,” and then click on “History” again in the sub-menu.
- Clear Browsing Data: In the History tab, click on the “Clear history” button at the top.
- Select Data to Clear: Check the box next to “Browsing history.” You can also choose other types of data you wish to delete.
- Choose Time Range (Optional): If you want to clear history from a specific time range, click on the drop-down menu and select the desired option.
- Clear Browsing Data: Click on the “Clear” button to confirm and clear your browsing history.
Clearing your browsing history in Microsoft Edge is a simple process that can help protect your privacy and improve your browsing experience. Whether you use keyboard shortcuts or access the menu, you now know how to clear browsing history on Edge effectively. By regularly clearing your browsing data, you can keep your online activities private and ensure that your browser runs smoothly.
7. How to Clear Browsing History in Safari on a Mac
Clearing your browsing history in Safari on a Mac is a simple and effective way to maintain your privacy and ensure that your online activities remain confidential. Whether you want to remove sensitive information or just start fresh, Safari provides an easy process to clear your browsing history. In this guide, we’ll walk you through the steps to clear your Safari history on a Mac.
If you are an Apple user, you probably use Safari as your default browser. To clear your browsing history in Safari, follow these steps:
Step-by-Step Guide to Clear Safari History on a Mac:
- Open Safari: Launch Safari by clicking on its icon in the Dock or by locating it in the Applications folder.
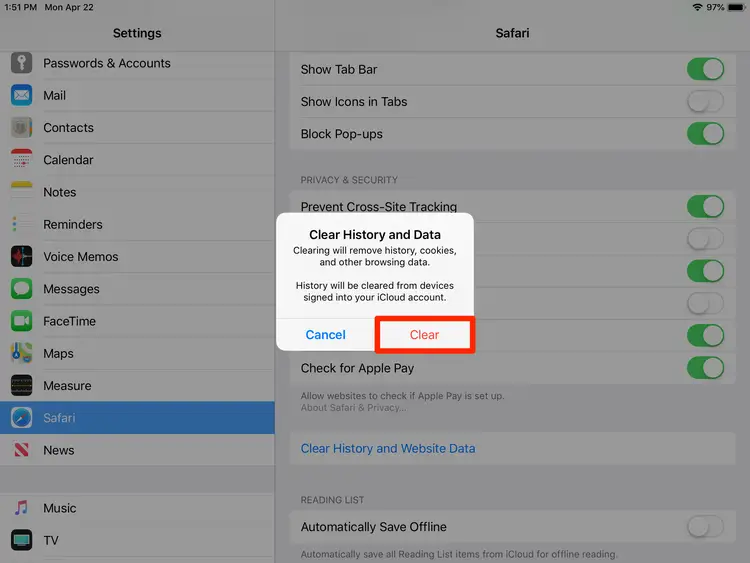
- Access History: In the top menu bar, click on the “History” tab. A drop-down menu will appear.
- Clear History: From the “History” drop-down menu, select “Clear History…”. A pop-up window will appear, allowing you to customize the options for clearing your history.
- Time Range: In the pop-up window, you can choose the time range for which you want to clear the history. Safari provides options to clear the last hour, today, today and yesterday, or all history. Select “all history” if you want to delete everything.
- Confirm: Once you’ve chosen the time range, click on the “Clear History” button at the bottom right corner of the pop-up window. A confirmation message will appear, asking you to confirm your action.
- Confirmation: Click on “Clear History” in the confirmation message to proceed. Safari will then start deleting your browsing history based on the selected time range.
Note: Clearing your browsing history will also remove website data, cookies, and cached files associated with the cleared history.
Bonus Tip: Clearing Individual Items from Safari History
If you only want to remove specific items from your Safari history, follow these steps:
- Open Safari and click on the “History” tab in the top menu bar.
- In the drop-down menu, locate the entry you want to remove.
- Right-click (or control-click) on the specific entry you want to delete.
- Choose “Delete” from the context menu that appears.
The selected item will be removed from your Safari browsing history.
Clearing your browsing history in Safari on a Mac is a straightforward process that helps protect your privacy and keep your online activities confidential. By following the step-by-step guide provided above, you can easily clear your Safari history based on your preferred time range. Additionally, knowing how to remove individual items from your browsing history gives you greater control over your online footprint. Remember to clear your Safari history regularly to maintain a clean browsing experience and ensure your privacy remains intact.
Wrap up:
Clearing your browsing history regularly is an essential practice to safeguard your privacy and protect sensitive information from falling into the wrong hands. Whether you use Google Chrome, Mozilla Firefox, Microsoft Edge, Safari, or any other browser, the process of clearing your history is generally straightforward and similar. By following the step-by-step instructions provided in this blog, you can take control of your online privacy and keep your browsing experience safe and secure. Remember to clear your history periodically to maintain a clean digital footprint and enjoy a more private browsing experience.
With over 6 years of experience in content marketing, she combines her passion for technology and storytelling to craft engaging narratives that resonate with readers. A true tech enthusiast, she loves diving into the latest trends and innovations, bringing complex ideas to life through her words. When she's not creating content, you'll find her exploring new gadgets, tools, and everything tech!
- How Does Automated Scheduling Save Time and Boost Engagement? - April 16, 2025
- 21 Delicious High Protein Foods - May 31, 2024
- Black Seed Oil: Health and Beauty Benefits - May 30, 2024

